
Putting your home on the market can be a stressful process, especially when you don’t know what to expect. Fortunately, with the help of an experienced agent and this easy to follow guide, you can smoothly complete the process. Following these steps will help you prepare so you can get organized and sell your home for the best price possible.

What do you want to accomplish with the sale of your home? Do you want to make a certain amount of money that you can put toward a larger or nicer home? Do you need to sell it as soon as possible to facilitate a move to a new city or area? Once you understand your needs, you can better craft your offer. For example, if you need to sell quickly, you might want to price your home lower than if your goal is to make a certain profit margin. Make sure you convey these needs to your real estate agent once you choose one so he or she can adjust your selling price accordingly.

Knowing how to price your home is one of the most important parts of the selling process. When you set a fair price in the beginning, you’ll get the most interest from other real estate agents and prospective buyers. Overpricing your home could lead to reduced interest, and underpricing leads to receiving less than what your home is worth. Working with a real estate agent is the best way to determine the right selling price for your home. An agent with experience can determine what other comparable homes are selling for, evaluate the current market, and may even suggest a home appraisal.
If you’ve kept your home in showroom condition since you’ve lived in it, you’re in the minority of homeowners. Once you price your home, it’s time to start getting it ready to be shown to potential buyers. This includes getting rid of clutter, depersonalizing the space so that buyers can envision themselves in the space, making any small repairs, and doing a deep clean to make sure your home is in pristine condition.

I will develop a marketing strategy that is perfect for advertising your home. This involves listing the home and then driving the right people to that listing through social media campaigns, agent-to-agent referrals, traditional media, or SEO advertising. My team creates a marketing campaign that aims to get the most possible traffic to your listing in the first three weeks after becoming a client.

Receiving an offer is an exciting part of the process, but it doesn’t mean the journey is over. I will evaluate each offer and make sure the party making the offer is prequalified or pre-approved by a mortgage lender and that their offer is acceptable to you. If the offer is too low, you can make a counter-offer or offer other ways to bridge the gap, such as covering some or all of the closing costs, making repairs, adjusting the move-in date, or leaving some appliances or fixtures for the new buyer.

Once I deem the offer is acceptable, I will review the proposed contract to make sure it’s all in order and includes the necessary components such as deposit amount, down payment, financing, inspection rights and repair allowances, contingencies, settlement date, and a list of fees and who will pay them. When both parties have agreed to the term, a final contract will be prepared by your agent.

You have accepted an offer and are now very close to the end of your selling journey. But first, you and the buyer must make a list of what needs to be done before closing. In some cases, your home may need to be formally inspected, surveyed, and appraised. In other cases, major or minor repairs will need to be made before the house can close. I will head up efforts to develop and execute this list, get each action item paid for by the correct party, and make sure everything is in order by the closing date. A few days before the closing date, we will call the company closing the transaction to make sure everything is ready to go. If you haven’t done so already, you also need to make arrangements to move out of the home so the new buyer can take possession.
You’ve reached the last step in the seller’s process. When you close on a home you are selling, you are legally transferring ownership of the property to the new buyer. I will meet with the company closing the transaction to sign the final paperwork and go over any issues that have not yet been taken care of. During this time, you can also make plans with your real estate agent to handle final details such as canceling utilities, cable, and lawn or trash services, changing the name on accounts that the new owner is retaining and ensuring the new owner has instructions for all appliances that will remain in the home.
Remove family photos, diplomas, religious items, and political materials
Replace with neutral artwork or leave walls bare
Eliminate odors rather than covering them
Avoid plug-in air fresheners, candles, or heavy fragrances before showings
Address pet, smoke, and cooking odors with cleaning and ventilation
Set thermostat to 68–72°F year-round for showings
Open blinds during daylight showings unless privacy is an issue
Confirm all windows open and close properly
Fix leaky faucets, running toilets, and sticking doors
Patch holes and touch up paint in high-traffic areas
Replace burned-out bulbs and broken fixtures
The Number 1 Rule: DECLUTTER
Arrange seating to define conversation areas without blocking traffic flow
Remove extra pieces if the room feels crowded
Pull furniture 6–12 inches from walls to create dimension
Clear the fireplace mantel to 3–5 curated items maximum
Remove personal photos and replace with neutral art or mirrors
Keep coffee tables clear except for one styled tray or book stack
Replace bulbs with consistent color temperature (2700K–3000K warm white)
Add a floor lamp if corners feel dark
Confirm all switches and dimmers work properly
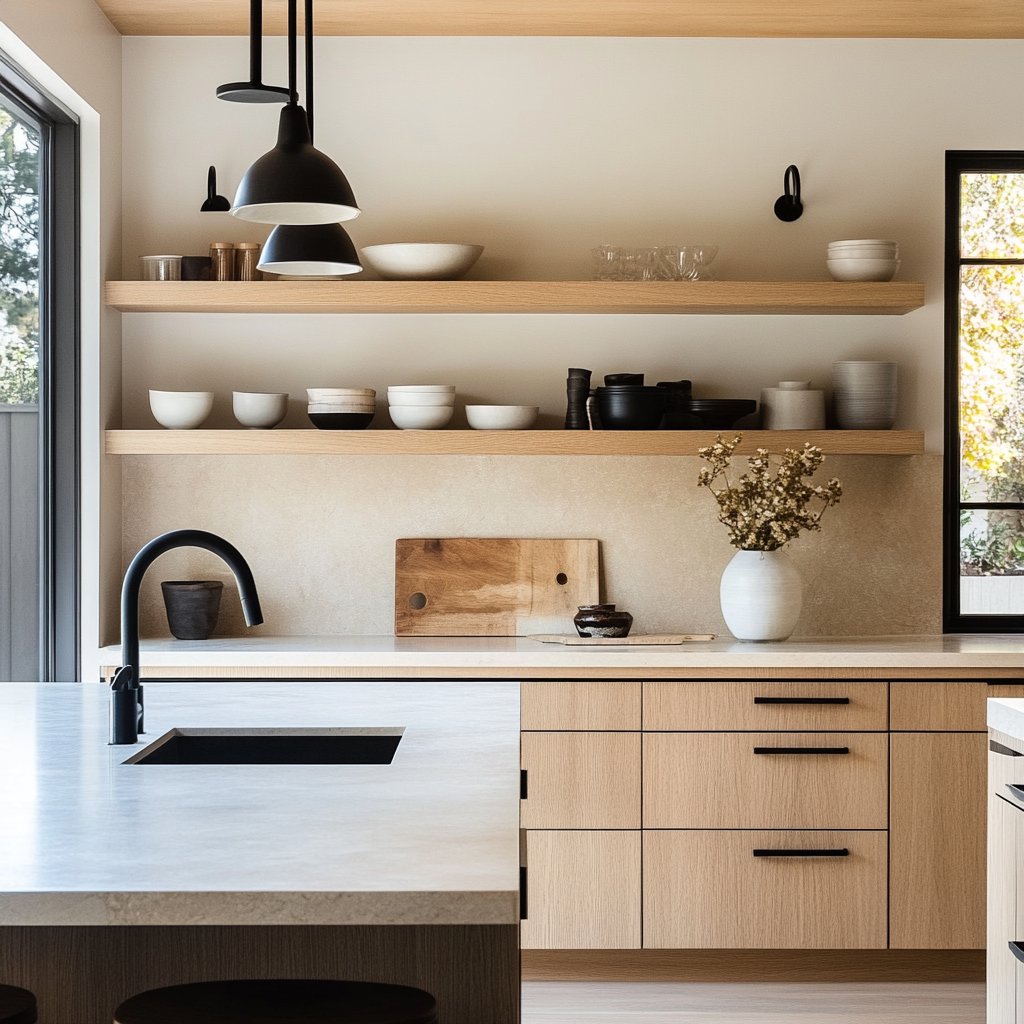
Clear everything except coffee maker or stand mixer if high-end
Remove dish racks, sponges, soap dispensers, and magnets
Wipe down backsplash and grout lines
Organize cabinets and pantry—buyers will look
Remove half-empty boxes and expired items
Reduce visible items by 30–50% to show storage capacity
Clean or replace burner pans and oven racks
Polish stainless steel with appropriate cleaner
Ensure all appliances are functional; repair or disclose issues
Use neutral duvet or comforter in white, gray, or beige
Add 4–6 pillows in coordinating shades
Ensure mattress sits at appropriate height (not on floor, not unusually high)
Remove off-season clothing and store elsewhere
Use matching hangers
Clear closet floors except for shoes in organizers
Remove visible medications, personal care products, and laundry
Limit nightstand items to lamp and small decor
Take down personal photos and memorabilia
If used as office, gym, or storage, return to bedroom setup for showings
Stage with bed (or daybed) and minimal furniture
Avoid multi-purpose appearance—choose one function
Remove character bedding, posters, and toys for showings
Use neutral bedding even in kids' rooms
Keep furniture scaled appropriately for room size
Clear all countertops except hand soap in simple dispenser
Remove toothbrushes, razors, makeup, and medications
Store bathmats and show curtains during photos; replace for showings
Re-caulk if grout or caulk lines show mildew
Replace worn toilet seats
Ensure exhaust fans work and are quiet
Use matching white or neutral towel sets
Fold or hang uniformly
Replace any with stains or wear
Leave table clear or set with simple placemats and centerpiece
Remove extra leaves if table feels oversized for the space
Confirm chandelier or pendant is centered and functional
Clear china cabinet or hutch to 50% capacity
Remove personal collections
Style with neutral dishes or glassware if showing storage
Remove paperwork, bills, and personal documents
Keep desk clear except for lamp and minimal decor
Organize cords and cables
Demonstrate adequate lighting
Show functional workspace without clutter
Avoid excessive personal branding or hobby-specific setups
Install or declutter shelving
Remove half-used detergent bottles and cleaning supplies
Keep counters clear if applicable
Clean lint trap and exterior of machines
Ensure machines are level and don't show rust or damage
Wipe down utility sink
Limit shoes to none or one pair per person in hidden storage
Use one hook per person if coat hooks visible
Add mirror or simple console if space allows
Replace worn mats
Clean or refinish flooring if scuffed
Ensure door hardware is polished and functional
Park cars elsewhere during showings if possible
Clear floor space to show capacity
Organize tools and equipment on walls or shelving
Remove cobwebs and dust
Ensure garage door operates smoothly
Repair any visible damage to drywall or doors
Once you have sold your home, you’re free to take the next step on your journey. Whether this is relocating to a new city, moving into a larger home, or downsizing and enjoying your life as empty-nesters, knowing all your selling responsibilities have been taken care of will help you achieve peace of mind for your new path.
Calm, strategic guidance built on trust, precision, and respect.

CANDI BORCK
ADDRESS 2010 8TH AVE S NASHVILLE TN 37204